AddThis

Showing posts with label Forensics. Show all posts

Tuesday, March 14, 2017

Detecting an Attacker Dumping Passwords from the Windows Registry

Several tools are available to dump password hashes from the Windows registry such as Mimikatz and gsecdump. Attackers commonly dump domain cached credentials, local user credentials, and LSA secrets from the registry

In this post, I will provide the steps for configuring object access auditing so that you can detect an attacker extracting password hashes from the Windows registry.

These auditing settings can be applied to endpoints across your environment via Group Policy but in this example, I will be applying the settings to a single computer.

Configure Registry Auditing to Detect Access to Registry Hives/Keys

Under the “Local Computer Policy” settings (Group Policy if applying settings from a domain controller, turn on “Audit object access” for successful and failed access events.


In regedit.exe, apply the configuration below to monitor for successful and failed read attempts to the following root keys and subkeys:

Cached Domain Credentials:

HKLM\Security (This key only)
HKLM\Security\Cache (This key and subkeys)
HKLM\System (This key only)

LSA Secrets

HKLM\Security (This key only)
HKLM\Security\Policy\Secrets (This key and subkeys)
HKLM\System (This key only)

Local password hashes

HKLM\Sam (This key only)
HKLM\System (This key only)


Detect Access Attempts to Registry Keys and Sub-Keys

You will see Event ID 4656 logged when password hashes are dumped from the registry using tools such as as Mimikatz, Pysecdump, Metasploit.

mimikatz # lsadump::cache


Detect Use of reg.exe to Save Registry Hives

You will also see Event ID 4656 when reg.exe is used to save the HKLM\Security, System, or Sam registry hives.

reg.exe SAVE HKLM\sam sam_backup.hiv
reg.exe SAVE HKLM\security security_backup.hiv
reg.exe SAVE HKLM\system system_backup.hiv


I hope you found this information useful. Please feel free to contact me with any questions or share any other techniques you have for detecting password dumping activity.

Monday, March 13, 2017

Detecting an Attacker Dumping Passwords from Memory

Mimikatz (https://github.com/gentilkiwi/mimikatz) is a popular tool used by adversaries (and Red Teamers) to dump passwords from memory. Password dumping from memory is more difficult to detect than dumping passwords from the Windows registry.

In this post, I will provide the steps for how to detect passwords being dumped from memory by configuring Sysmon v6. You can then filter the logs before forwarding the appropriate sysmon events to your SIEM.

Install and Configure Sysmon v6

Download Sysmon v6: https://technet.microsoft.com/en-us/sysinternals/sysmon

Create a file named sysmon_config.xml and copy the configuration below into the file.

<Sysmon schemaversion="3.3">
    <HashAlgorithms>SHA256</HashAlgorithms>
    <EventFiltering>
        <ProcessAccess  default="include">
        </ProcessAccess >
    </EventFiltering>
</Sysmon>

Install Sysmon using the configuration file you created:

sysmon64.exe -i .\sysmon_config.xml

Validate that the configuration has been applied by dumping the current sysmon configuration:

sysmon64.exe -c


Dump Passwords From Memory Using Mimikatz

To test the Sysmon Process Access logging, dump your passwords from memory using Mimikatz.

PS C:\Users\fmfx009\Downloads\mimikatz_trunk\x64> .\mimikatz.exe
privilege::debug
sekurlsa::logonpasswords


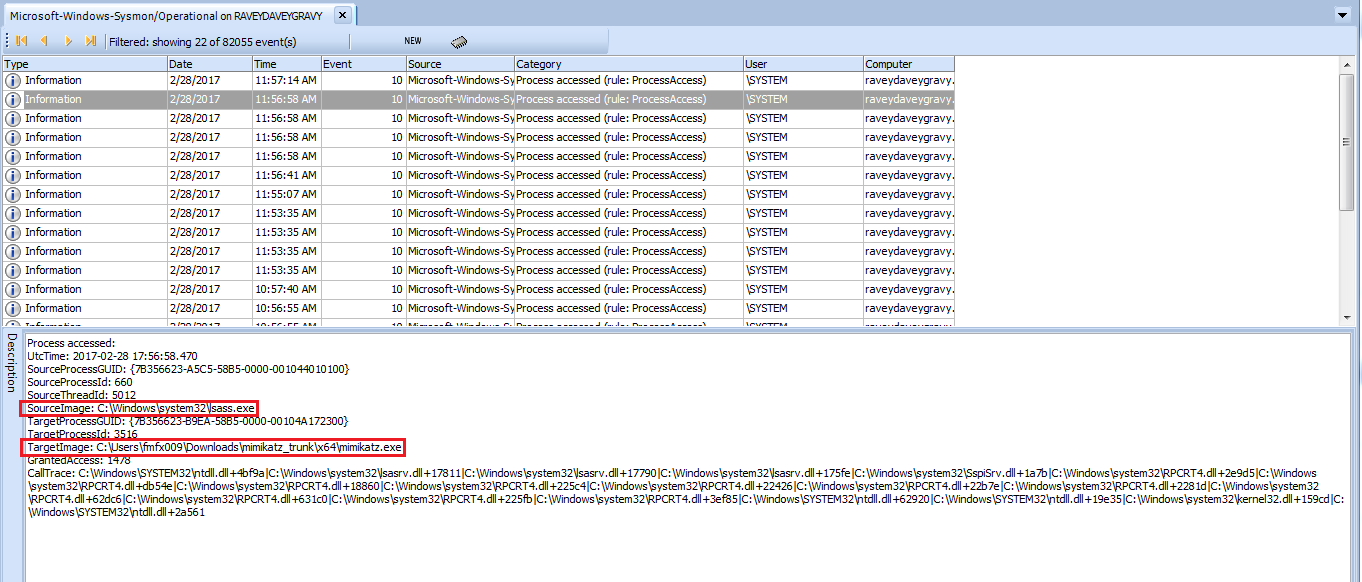
Review Sysmon Event Logs for Mimikatz Usage

Access the Sysmon logs via the Event Viewer under Microsoft-Windows-Sysmon/Operational or use the filtering features of Event Log Explorer.

Apply a filter to view all events with Event ID 10, “Process accessed”.

You should see evidence of SourceImage: lsass.exe accessing TargetImage: mimikatz.exe. You should also see evidence of SourceImage: mimikatz.exe accessing TargetImage: lsass.exe


I will write some additional posts soon on how to detect other credential dumping tools on your endpoints.

Please feel free to contact me with any questions. If you have any other techniques for detecting password dumping activity, I would be happy to hear from you. I hope this information helps.

I experienced issues configuring Sysmon v6 to monitor Process Access and have reported a bug to Mark Russinovich; the current configuration output shows Process Access as disabled when it is actually enabled.

Saturday, September 10, 2016

Mounting a BitLocker Encrypted Image Using Dislocker

Sometimes it is necessary to boot a host into an alternate OS to acquire a raw disk image. If you need to mount the image for forensic analysis in Linux, this can present a problem if the disk was encrypted using Microsoft's BitLocker.

If you have the BitLocker recovery key, you can mount the image in Linux using Dislocker as follows. These steps were executed on an Ubuntu 14.04 LTS system.

Install Dislocker

Install Dislocker's dependencies.

aptitude install gcc cmake make libfuse-dev libpolarssl-dev ruby-dev

Clone the Dislocker Git repository.

git clone https://github.com/Aorimn/dislocker.git

Navigate to the dislocker directory you just created.

cd dislocker

Make and install the binaries on your system.

cmake .
make
sudo make install

output of 'man dislocker' command

Mount the Image

Create a temp directory where you will mount the image.

mkdir /mnt/dislocker

Read the encrypted raw image using dislocker.

dislocker -v -V /media/images/myimage.bin -p<BITLOCKER-RECOVERY-KEY>  /mnt/dislocker

Further details about the above command.

-v - Increase verbosity (CRITICAL errors are displayed by default)

-V - Volume to get metadata and keys from

​/media/images/myimage.bin - Path and file name of encrypted image

-p<BITLOCKER-RECOVERY-KEY> - BitLocker recovery key to unencrypt image. Replace <BITLOCKER-RECOVERY-KEY> with actual recovery key

/mnt/dislocker - Path to load dislocker file, which will be mounted later
Create a folder to mount the image.

mkdir /tmp/temp/

Mount the dislocker file as read only to the /mnt/temp directory

mount -o loop,ro /mnt/dislocker/dislocker-file /mnt/temp

Further details about the above command.

-o loop,ro - Mount the filesystem using the loopback device. Mount as read-only

/mnt/dislocker/dislocker-file - Path and file name of unencrypted dislocker file

/mnt/temp - Path to mount the unencrypted image as a drive

The unencrypted image is mounted under /mnt/temp

List the contents of the mounted image.

ls /mnt/temp

Acquire an Image of the Mounted Disk in an Unencrypted State

You may want to take another image of the mounted image in its unencrypted state. This can be useful if you need to load the image into a forensic tool for analysis.

You can use ddrescue to take a raw image of the mounted image as follows.

ddrescue -v /mnt/temp/dislocker-file /media/images/my_unencrypted_image.bin

Further details about the above command.

-v - Verbose logging

/mnt/temp/dislocker-file - Location of file you want to image in unencrypted state

/media/images/my_unencrypted_image.bin - Location to save new image file